
The most common question I get asked is how to use one or more of the spreads in my planner. The planner was originally designed after how I would organize my school in a notebook, the additional things I would map out that didn't exist in store-bought planners. When I decided to create a homeschool planner that utilized the way I was organizing my homeschool year, I wanted to make it as flexible and customizable as possible because I knew no two homeschools look the same. As a result, some of the page designs became extremely minimal so they could be used in multiple ways, making them useful for a variety of homeschoolers.
In this blog post I'm going to go through each and every page design from my homeschool planner, explain how to use them and show you some examples of how I use them in my homeschool, but remember, you can easily adapt some of these pages for your homeschool and your way of organizing, it doesn't have to look the same way as mine if you homeschool differently than I do.
So, let's begin with the pages that help you plan your homeschool year which include two of the spreads that cause the most confusion: the "term goals" spread, and the "year ahead" spread.
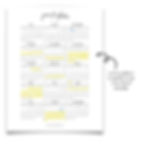
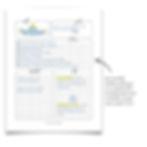
Starting with "Year at a Glance" - this overhead view of the calendar year was meant to accommodate most homeschoolers, whether they start school in August, September, or even July, and whether they homeschool year-round or not. Some people may not have a use for a year calendar, but I like to use it to highlight all of the days we are NOT schooling during our homeschool year. This includes our term breaks (we take one week off every 6 weeks of school), and our vacation breaks including the holiday break, spring break, and summer break. I also circle my first and last days of school. This spread makes it very easy if I just quickly need to see where our scheduled breaks fall while planning other things in our personal lives, and my kids love to look at it to see how far away they are from the next scheduled break. It's not the only spread that will show my schedule, but it's the easiest bird's eye view of my schedule in my planner and that's how I like to use it. You could use it to emphasize other parts of your homeschool, maybe you want to highlight field trip days, sports events, co-op days or anything else you want to see at a glance in this way. How you use it is completely up to you.
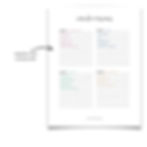
Let's look at the "curriculum and resources" page next. Back when I first made this planner, I wasn't using any kind of all-in-one curriculum. Instead, I was using just about anything and everything I could get my hands on, and mix-and-matching it to my liking. I joined a co-op for buying online resources and had more options than I knew what to do with. I needed to write everything down so that I could not only keep track of what I had but also organize how I was planning to use it. Some resources like reading eggs were only being used for language arts but other sources like BrainPOP were being used for all subjects. So keeping an organized list like this helped me make sense of it all and make sure I wasn't leaving anything behind. These days my kids are older and life is much busier so I'm using resources like miacademy and miaprep that really cover all my subjects in one place but I still supplement with a few things on top of that so I still utilize this page. If you use one curriculum for all things and no supplemental resources, then this is a page you can skip.
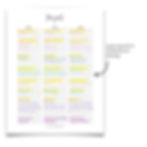
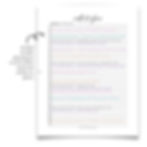
Now let's talk about "term goals". There are 6 six-week term periods of school. This spread splits them up into 3 terms per page for more detailed forward planning of your curriculum topics. You can use a page to plan 3 terms for 1 child, or 3 terms for 1 subject for that child. It's up to you: how much detail you want to go into when planning, and how much space you'll need as a result.
If you’re planning unit studies, this layout makes it a breeze. Simply write out each unit study you want to cover during each six-week period and how long each will take to complete. Like the Year Ahead page, this helps you pinpoint the best timeframe for each topic. However, with Term Goals, you can delve deeper into your planning, organizing your curriculum by term periods.
My favorite way of using this spread was back when I used a more mix-and-match approach. Since I smashed together my own curriculum in those days, this helped tremendously in that process. Seeing it all on paper, split into 6-week goals helped me put together lessons much easier and made me more confident that I wasn't leaving anything out, or piling too much on, and helped us stay on target. I also used it to outline unit studies for two years that we did only unit studies (plus a math curriculum) for homeschool. So, this simple little spread is pretty powerful because of its simplicity. It's what allows it to be used by anyone regardless of their homeschool style or preferences as its main objective is simply goal planning.
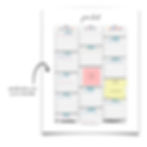
Now let's dive into the "year ahead" spread. I get 2 different types of feedback on this one. People either message me to say, "what the heck do I do with this page" or "this one page is the reason I buy your planner". Like term goals, it's such a simple page design, it's so open that it's easy to see how one might wonder what they are supposed to do with it, but it's really just a schedule builder.
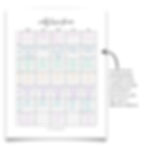
The Year Ahead page divides your year into quarters, so you'll work on one quarter per page. Start by labeling your months. Each row is numbered to 31, so black out the bottom row of any month with fewer than 31 days. Then, label your first day of school and start blocking out your school weeks.
The rest is up to you. I'll tell you how I use it. First, I go through and number my weeks of school, putting a thick black line between them. Then I identify my breaks and use either stickers to label them or a highlighter. Then I write in holidays and any other important days. After that I'm able to put in what the focus of that week is whether it's prepping for an art project or science fair or deciding what unit study we will be doing that week. One technique I love is using sticky notes (the small ones fit this layout perfectly). I jot down specific topics on sticky notes and place them on the weeks I think we’ll cover them. As I fill in the school year, I can easily shuffle things around, ensuring a perfect schedule. This flexibility allows for mid-year adjustments without any hassle. Sticky notes also add an extra layer of labeling, providing more space for notes on each week.
Having it set up like this (rather than one month at a time) makes planning go really fast. I'm able to get my entire year's schedule planned in just a few minutes and plug in all the important stuff really fast. But you could also just use it as an at-a-glance field trip or event planner, a daily topic or theme planner, daily book lists if you do morning reading time with littles, the possibilities are completely endless. There is no best way to use this spread, it's completely up to each person how they want to utilize this page to best fit their unique needs.
Now let's look at the spreads you will be using to organize your month. These include the monthly calendar which we are all familiar with, the weekly lesson plan which you may have seen in teacher planners, the monthly dashboard and the month at a glance. When used together they keep even the most chaotic homeschool completely organized.
The first page of the month should be your Monthly Dashboard. This is where your goals, to-do's, notes, and important info for that month are kept where you can quickly access them.
After that would be your Monthly Calendar where you schedule your month how you normally would.

Next would be your Month-at-a-Glance page. This is where you can elaborate on details for each day, all the things you need to write down about that day that won't fit in a tiny little calendar square. I love this page, it's been a game changer for me, helped me to reduce the sticky note clutter and scratch notes all over my monthly calendar. My monthly calendar stays clean and readable and has plenty of room for stickers if I decide I want to decorate. But you don't have to use it only that way, it really could be used as a daily list as well, maybe daily theme list, daily book list, daily road-run list if you have a ton of events to keep up with, whatever works best for you.
And finally, the Lesson Plan page is where you will lay out your day-by-day lesson plan for up to 7 subjects. With the printable version of this planner, you can keep lesson plan pages for each kid so you don't have to share space.
The rest of my page spreads are pretty easy to use as they are made for specific functions. Let's look at the collection of record-keeping pages next. These include the grade tracker, attendance list, transcript tracker, and activity tracker.

Of all of these, the most flexible is the activity tracker because it can be used endless ways. When my son was very small, I used this for him instead of the lesson planner. I had tons of little activities I rotated through for him, doing different activities on different days, nothing strictly planned in advance, but I wanted to track what we were doing each day. So, at the top of the tracker, I listed out everything from coloring to arts and crafts, morning reading time, handwriting practice, reading eggs, Osmo, workbooks and worksheets, name writing practice, and life skills stuff like making the bed, brushing teeth etc. - all kinds of things. Then I would check off or color in the squares for the activities we did each day. ( I love the color blocking method, where I color coded every activity at the top then completely colored in the block for that activity, made it so much easier to see at a glance where we were putting our energy in all month.) Since it's an activity tracker your options are endless, track chores, workouts for PE, or anything else you want your kids doing that doesn't exactly go on the lesson planning pages.
The grade tracker and attendance tracker are self-explanatory. I don't personally use these spreads because I live in a state that's very easy to homeschool. But I made these spreads for those who life in states that require more strict record keeping. Having your attendance for the year on one page and your grades all in one place are so much easier than sifting through a years' worth of calendars and lesson planning pages to get your data.
The transcript tracker is something new I added this year since I'm homeschooling high school now. It's not meant to be used as a transcript template as it's missing some things. It's simply meant to be used as the place where you log your subjects, grades and credits for each year of high school as you go through it. Later at the end of high school you would use this data along with other things like test scores to make your real transcript. It just helps that process to be a little less overwhelming for all those homeschooling high school.
The next spreads are reading list options. While you could just write down your children's reading goals on a sheet of paper as a boring list, that wouldn't be much fun would it? This reading list pages make is fun for kids to get though all their books each school year. With the wreath design, you can write all the books in advance, then have your child color in the circle each time they finish the book. You can do the same with the bookshelf design by having them decorate the book each time they finish. And for the older kids, the book review spread let's them leave a review of the book after they finish.

The next pages are there to help you organize all the other aspects of "homeschool life", and by that I literally mean home and school life.

The Accounts and Subscriptions page is useful if you utilize any online resources. You need somewhere to keep up with them all, the website for the resource, the purchase and expiration date if you have one and the price you paid or expect to need to pay at renewal time. This is great for those who are using tons of online options to the point it can become messy to keep track of. As I mentioned before, I used to be part of a co-op that collectively bought lots of online resources and we paid very little each, which allowed us to afford a huge collection. Our biggest issue became keeping up with it all. If this sounds like you, then you'll find this page useful. If you work out of a book curriculum with no online resources, you can skip this particular page. The Password Keeper pairs perfectly with this spread since it will hold all of the login and password info for everything you use online, paid or not.
The Field Trips and Events page allows you to log all the important details associated with your outings. The Budget Tracker does exactly that and keeps it all in one simple place, making it very convenient around tax time as well as helping you streamline next year's budget planning. Homeschool Connections is a place for you to keep track of all the wonderful families you'll be friending. Keep their names, phone numbers and social handles in one space for analog lovers.
And the Meal Planner page is included for those who like to meal plan a week at a time.
The last page is the Year in Review and it acts as a reflection of your homeschool year. It's a wonderful way to close out your planner for the year and helps turn it into a keepsake. It's fun to look back on years later and see how much things change. Of course, a guide is always included with the planner but I wrote this blog post for the purpose of going in a little deeper and adding those visual examples for some of the more difficult to understand spreads.
I hope this post was helpful for anyone using my planners. Feel free to leave any questions or comments below and let me know how you like to use some of these more flexible spreads, especially if you use them in a way I didn't mention above. If you found yourself here and don't already have this planner but are interested, you can snag yours here.
Happy Homeschooling!